Need to batch import images into Google Slides? In this tutorial, I'll show you how to use...
In this tutorial, I'll show you how to import, crop, resize, and format images into a presentation automatically. We will explore two scenarios, importing an image from your local computer and importing an image from Google Drive.
Follow along with the video overview:
Great presentations use lots of visuals to convey information. Charts and graphs, company logos, pictures, screenshots, even photos of the team can help get your point across. But keeping track of your images, inserting them, cropping, resizing, and positioning them can be a major time sink for you and your team.
Slideform presentation automation follows 3 basic steps:
1. Create a presentation template
My example presentation is a year-end report from a real-estate management company. The report includes two images that are automatically pulled into the presentation: a company logo, and a headshot of the account manager.
I created my presentation template in Google Slides with the styling, colors, and layout of the information I want to see in my report. Each data element is represented with a data pragma, denoted by curly braces {{ and }} . These pragmas will be replaced by content or images from my data sources. See my previous post for more details on this template.
 ⇐ Here is the first slide in the template.
I want to display the company logo on the first slide and also on each following slide. To do this, I created a placeholder for the logo in each location that I want to see it in the final presentation.
To insert a placeholder pragma for an image, first create a shape to hold the image. I used a rectangle in this example. Set the shape and size of the placeholder and the image will be cropped or stretched to fit. Set the fill color and the border to “transparent” if you don’t want your image to have a border or colored background.
Then click on the shape and enter the image pragma as text. The format for the image pragma text is {{image:imagename}} . In this case I named the pragma {{image:logo}} . You will be able to fill this image pragma with any image when you generate the presentation.
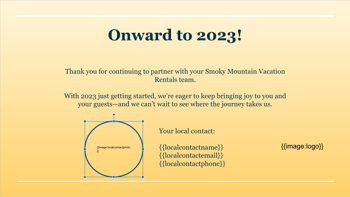
I also created an image pragma on the last slide to hold a photo of the account manager. I used a circle shape to hold the image and set the pragma to {{image:localcontactphoto}} . This image will be automatically cropped to the circle shape!
2. Link content to the template
Next, we open the template in Slideform and set up the mapping between each pragma and the data that it will be filled with. Slideform supports a wide variety of data sources that can be pulled into presentations.
The configuration page looks like this:
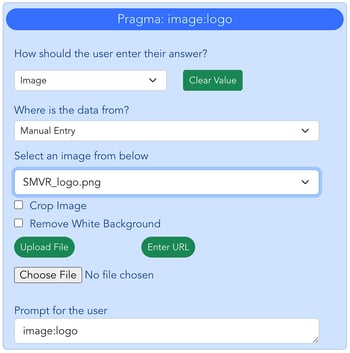
There are three ways to link images to your template: Upload the image from your computer, enter the URL for a publicly-accessible image, or link to an image in Google Drive.
Upload an image from my computer
In the setup field for the image:logo pragma, I can upload the company logo, called SMVR_logo.png, from my local computer. I can choose whether to crop the image or to stretch it to fill the shape (default). I could also enter a URL to an image here.
Now my logo is stored in Slideform and is available to use in other presentations too!
Import an image from Google Drive
I also want to import a photo of the account manager for each rental property. The company headshots and the account information are stored in Google Drive.
First, make sure to share the directory that contains the images with Slideform (share@slideform.co) using the Share button in Drive.
I set up a mapping table in a Google Sheet that shows which staff member is responsible for each property. I also included the link to their photo in the last column of the spreadsheet. I can also insert the image into the cell with the Google Sheets "Insert image in cell" .

I want to automatically pull in the correct headshot depending on which rental property I am making the presentation for. To do this, I set up the Slideform query to select the image URL that corresponds to the propertyname.
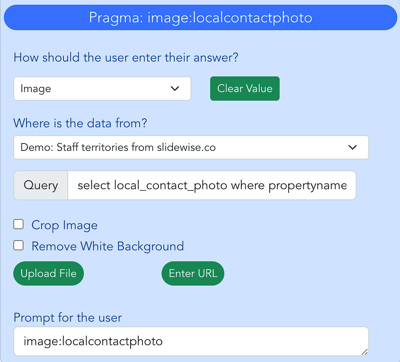
Now, when I generate the slide deck, I will see the correct headshot for the manager of that property, cropped to the circle shape.
3. Generate the presentation
 Click the Generate button in Slideform to compile the presentation and save it as PowerPoint, Google Slides, or pdf format.
⇐ Check it out! The headshot image is cropped to a circle and the company logo is resized and appears on each slide as indicated in the template.
I can easily re-generate this presentation for each of the many properties in my portfolio, swapping out the headshots or even the logo, without EVER having to open the slide template to resize or crop the images!
See How to automatically generate Google Slides from Google Sheets for more information. Or click below to Learn More!