In this tutorial, I'll show you how to import, crop, resize, and format images into a presentation...
How to insert batches of images into Google Slides
Need to batch import images into Google Slides? In this tutorial, I'll show you how to use Slideform to import multiple images and crop them to a shape automatically! We integrate Google Drive with Google Slides to pull in images. We can also pull in text and information from Google Sheets to go along with each image.
Slideform puts your presentations on autopilot! Connect content, data, graphics, and charts to your slide decks. With Slideform, businesses can create customized, data-intensive slide decks in a fraction of the time while enforcing branding and style guidelines.
Why import batches of images into a slide deck?
Inserting multiple images onto multiple slides is a common need in many industries. No one wants to manually copy and paste images into a slide deck. But easy-to-use automated solutions can be hard to find. That is why we created Slideform to pull the information you need into your slide decks and documents automatically.
Every day, Slideform clients use our solution in a variety of creative ways, such as:
- Real estate: Import images of properties into a deck along with data about each property.
- Materials list: Generate a document with a picture of each item and its description on a page.
- Product catalog: Insert an image of each product onto each slide and add product details alongside.
- Ad campaign reporting: Create a deck with an image from each ad campaign along with campaign performance metrics.
- Onboarding deck: Insert images of teams, headshots, org charts, and information into a deck for new joiners.
How to set up images to slides automation with Slideform
1. Gather your images
First, you need to upload all the images to Google Drive. Then create a Google Sheet with any data or text that you want to display alongside the images. Depending on your use case, this could include the name or caption for the image, metrics or KPIs pertaining to the image, or a description. You can use any data, or even a csv export of marketing metrics from Sprout Social, HubSpot, or Klaviyo.
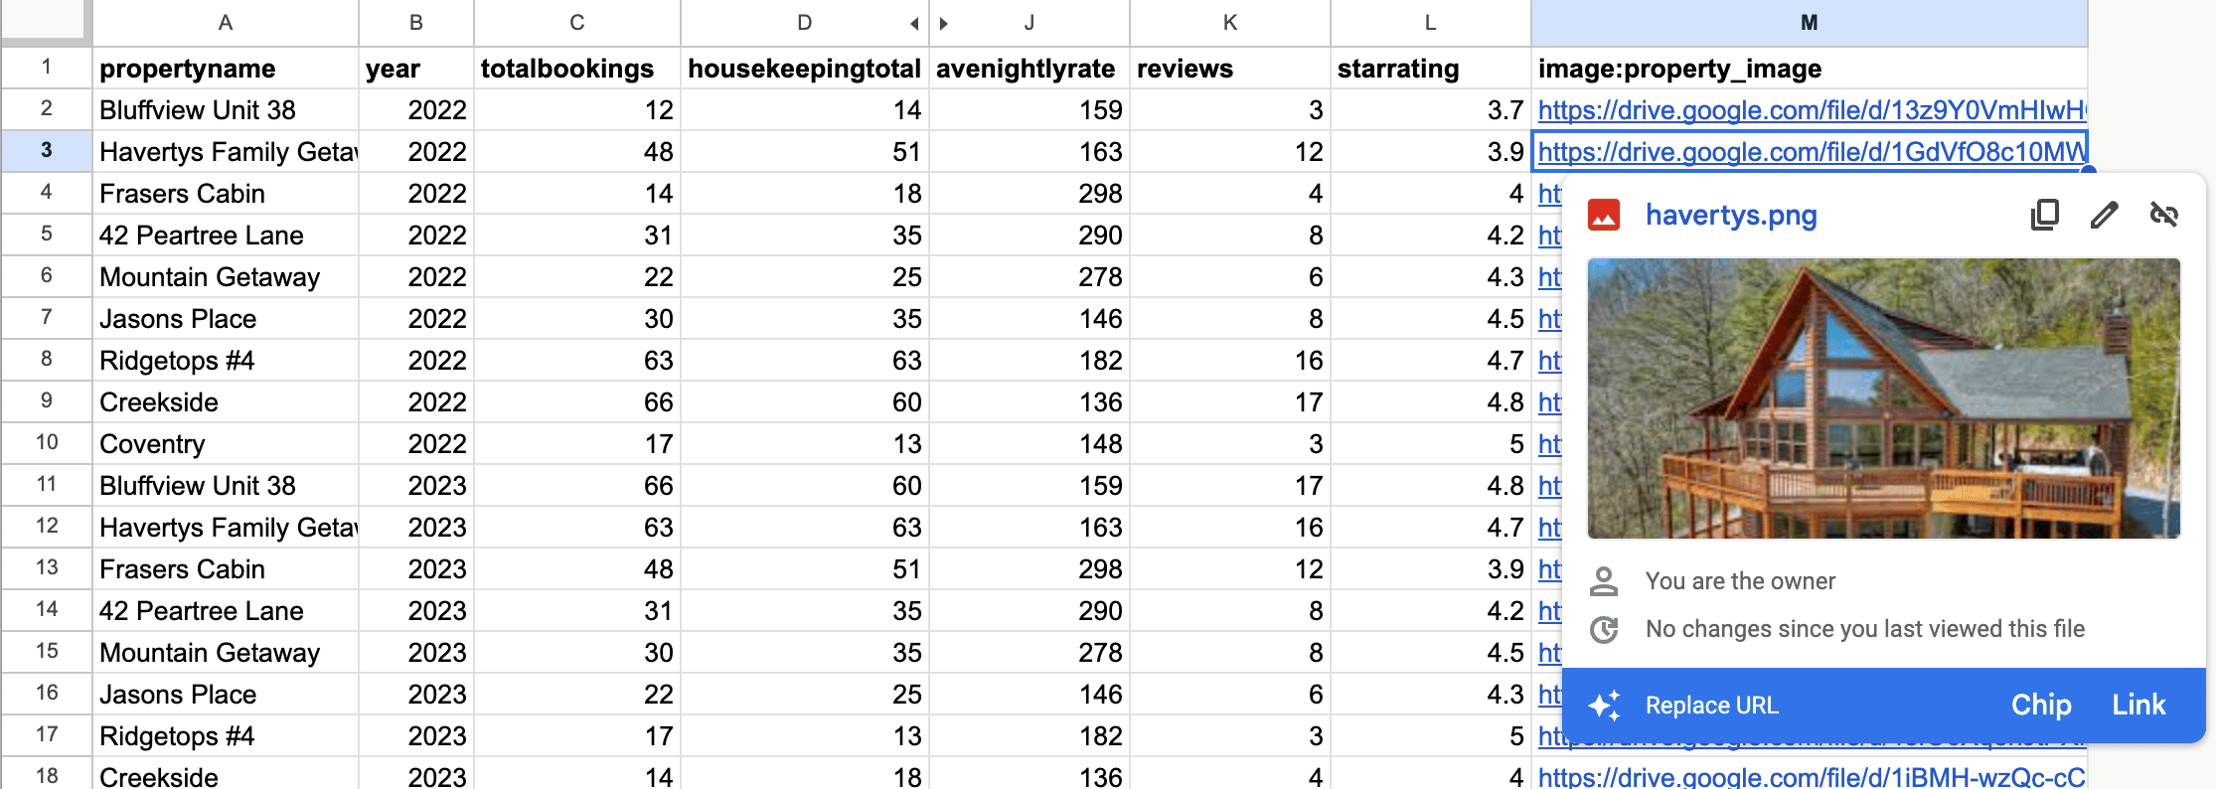
Create a column for the images, then insert the image inline into the cell (go to Insert > Image > Insert Image in Cell to embed your images into the Sheet). Or you can copy the Drive link into the Google Sheet.
For this tutorial, my example presentation is a year-end report from an AirBnB management company. The report includes an image of each cabin, along with some rental performance metrics. Take a look at the Google sheet:

Here is another example with images from Instagram posts:

Be sure to share the images and sheet with Slideform! 😎
2. Create a slide template
Next, we need to specify what we want the slide deck output to look like. If we want to create one slide for each image, then we will just need one slide which will be copied for each of the images. You can create a template in Google Slides or PowerPoint.
Slideform is a powerful tool that gives you the ability to fully control the styling and layout of your slides.
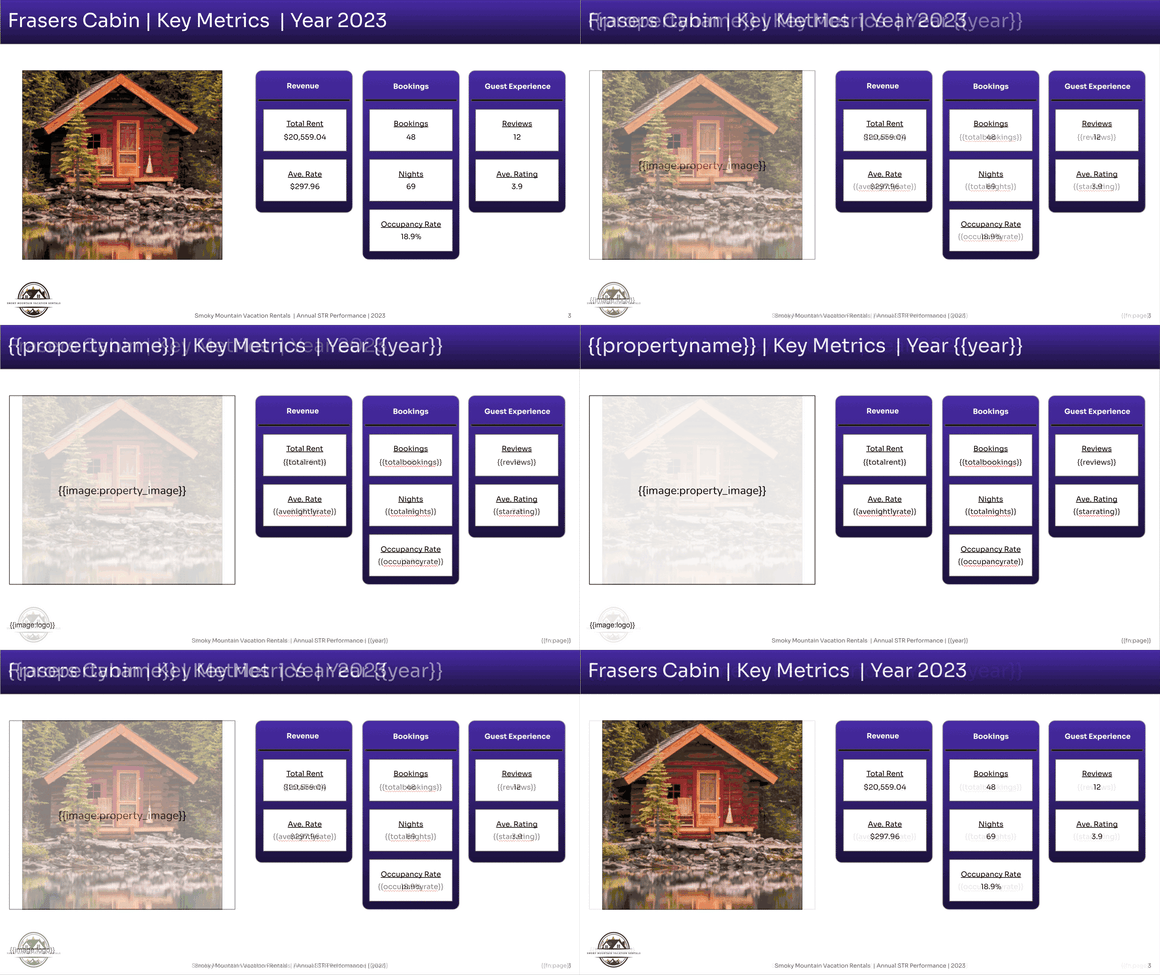
Here's how I want my images to be placed on my AirBnB report template:

I created my presentation template in Google Slides with the styling, colors, and layout of the information I want to see in my report. Each data element is represented with a data pragma, denoted by curly braces {{ and }} . These pragmas will be replaced by content or images from my data sheet. See the Help Center for more details on how to create a template.
To insert a placeholder pragma for my images, I first create a shape to hold the image. I used a rectangle in this example. Set the shape and size of the placeholder and the image will be cropped or stretched to fit. Set the fill color and the border to “transparent” if you don’t want your image to have a border or colored background. Then click on the shape and enter the pragma name in curly braces.
Once you have a slide template for your output, share it with Slideform and upload it to your account as a new project.
3. Generate the presentation
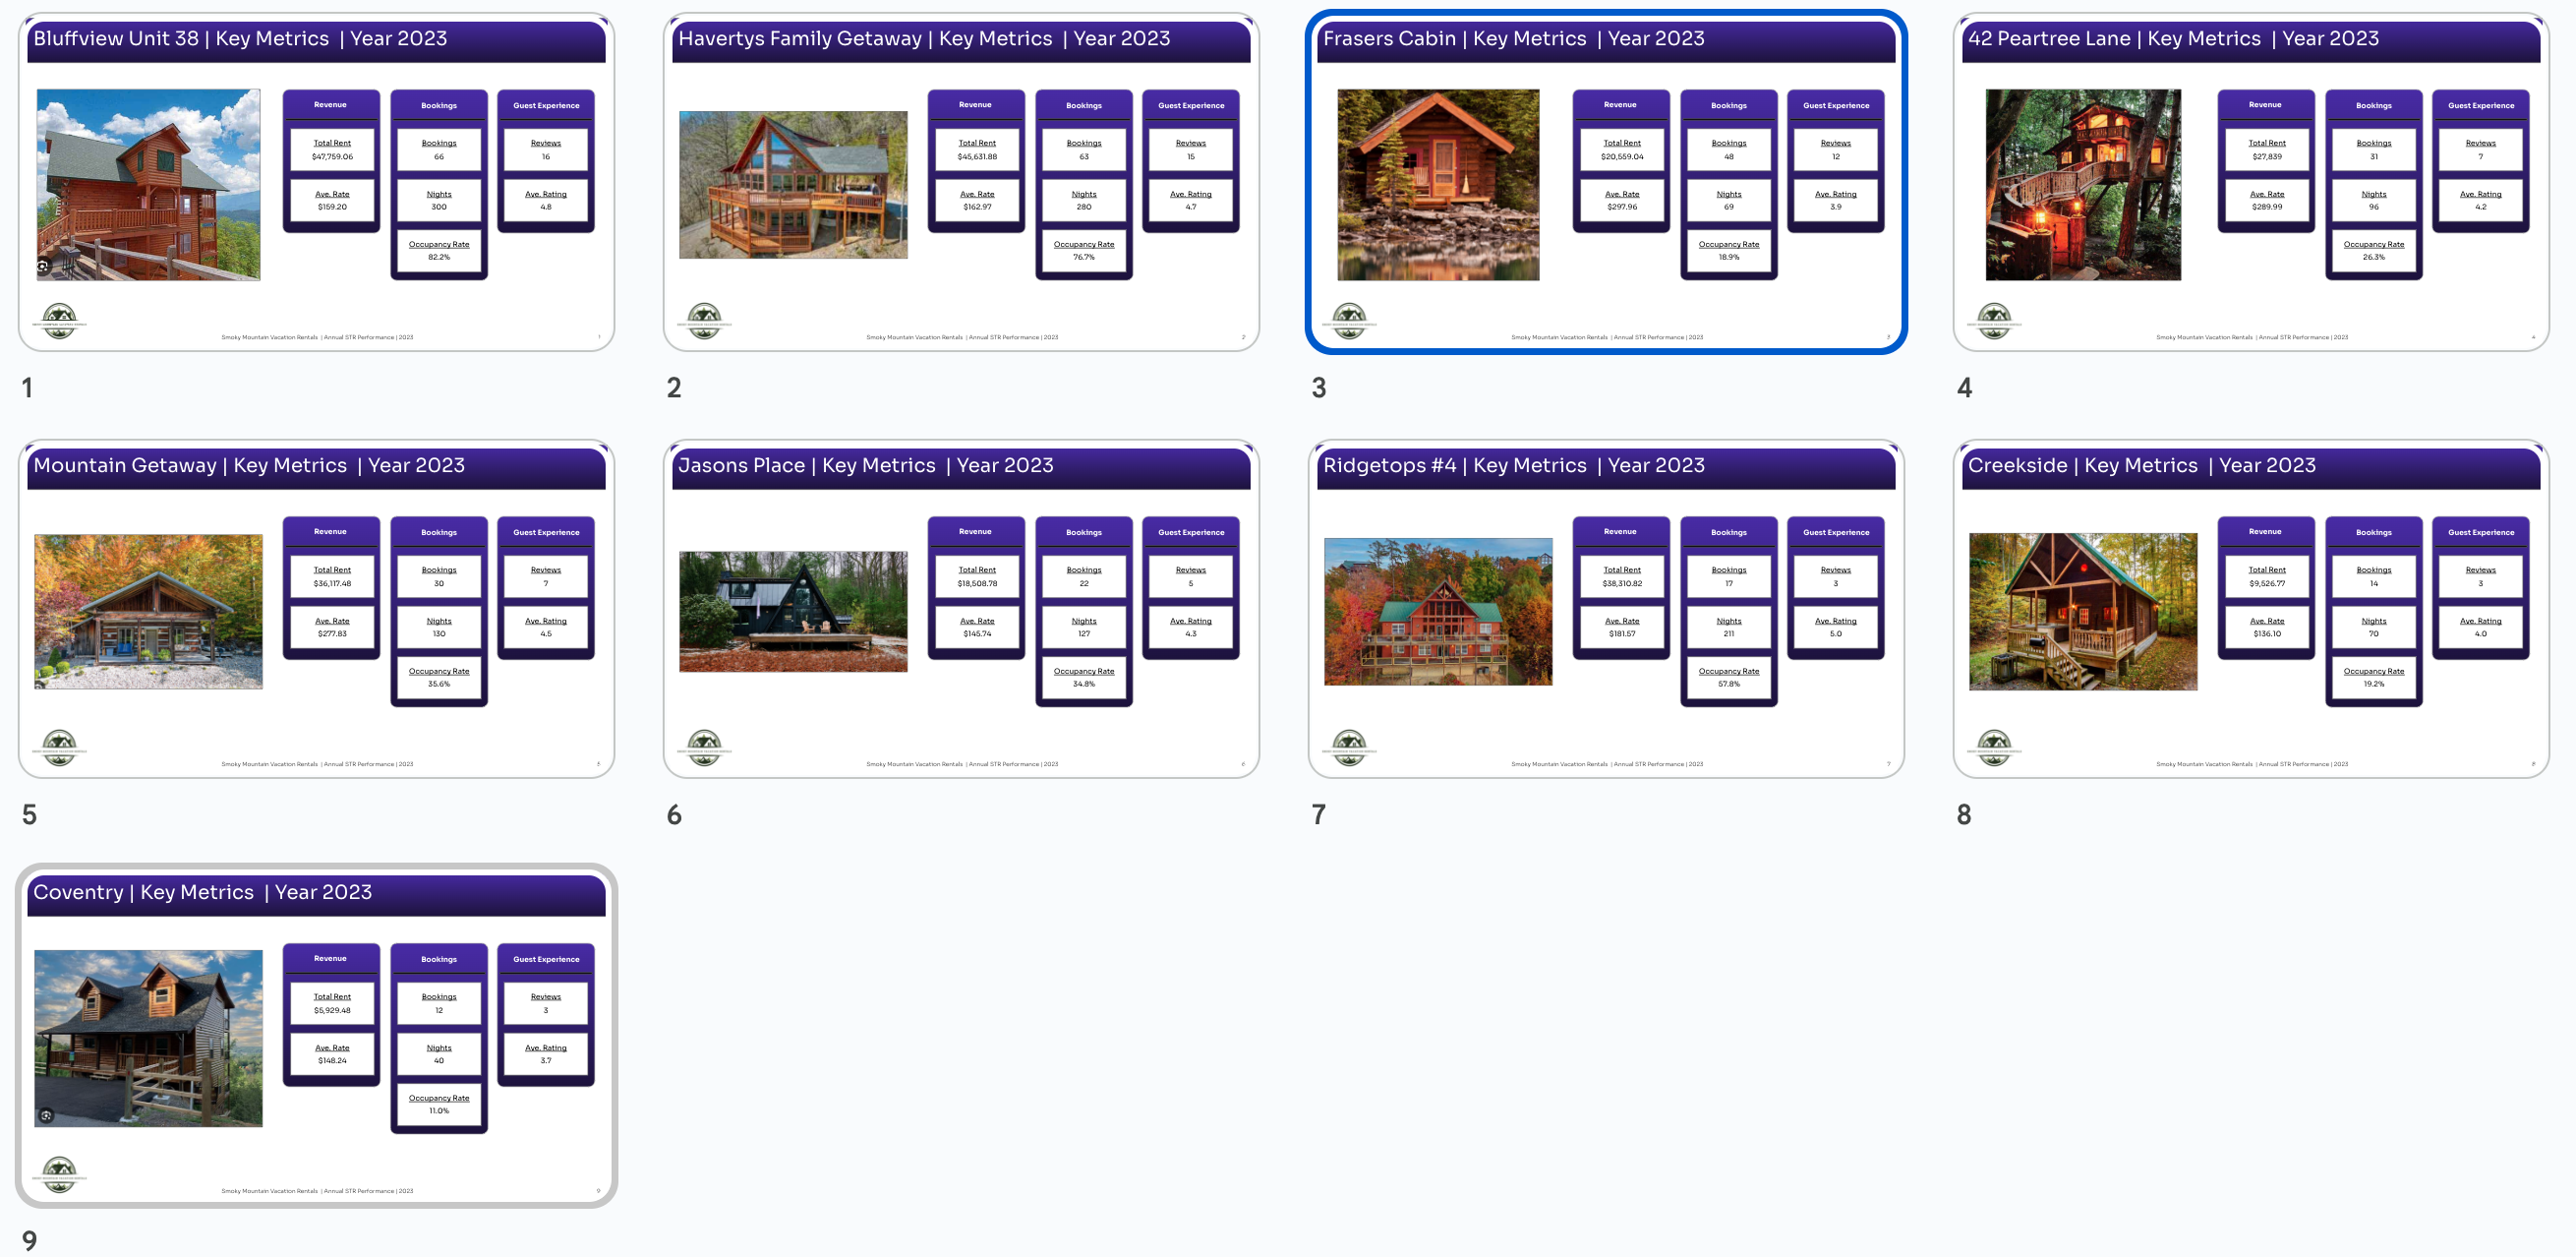
Now we can use Slideform's automation to place the images into the slides automatically. Use Bulk Mode to generate one slide per image. Click on Bulk Mode and go through the wizard to match each pragma to the correct data in your Google Sheet. Then click Create and your output will be generated.
Here's my Google Slides output for the AirBnB report:

4. Advanced Features
Advanced users will enjoy the flexibility and customization options in Slideform Bulk Mode, including:
- separate the slides into different presentations, or group them into one deck
- filter to create slides for only some of the images
- include a title and ending slide that are not repeated in the presentation
- control the formatting of numbers, currency, and dates
- name the output files according to a data field
- save as PowerPoint or Google Slides
- receive an email notification once the deck is done
Read more about Bulk Mode here: Slideform Bulk Mode
Ready to try it?


